

How Do I Get My Computer Out Of Automatic Repair?
If y'all ever encountered an error and don't know what to practice, Windows x comes equipped with troubleshooting tools to set up it for yous. One of those user-friendly tools is the automatic repair tool. Information technology is a handy repair characteristic that can troubleshoot problems that stop you from booting correctly.
But, what do you do when the tool itself is the cause of the error? If your PC is stuck in an automatic repair loop, we accept devised a list of solutions to set up your error.
What Is an Automatic Repair Loop and What Causes It?
An automatic repair loop is an error that occurs when Windows 10 tries to kicking and fails, and so forcefully boots upwardly the automatic repair tool and tries to repair itself. When Windows can't repair itself, it reboots and repeats itself in an endless cycle.
In that location isn't a unmarried crusade for a Windows x automatic repair loop and they can be hard to figure out. The most common crusade tends to be missing or corrupted organisation files, in which Windows can't kick or repair itself because these essential files it needs to run aren't available.
Missing device drivers also tend to be 1 of the biggest causes for the error. If you accept recently upgraded your PC, your new components will need device drivers to allow Windows to use them. If the drivers are missing, out-of-date, or not supported, they could cause a repair loop. New peripherals tin can also crusade this error if their drivers aren't installed correctly.
Other possible causes tend to exist related to faulty components, malware infections, corrupted arrangement registries, and fifty-fifty broken installation files. But, in that location is no demand to worry as our solutions will work for most causes of a Windows 10 automatic repair loop.
1. Run Fixboot and Chkdsk Commands
If you tin't identify any cause of a Windows 10 automatic repair loop, y'all can use some organization repair tools to try to fix it. The chkdsk command starts a low-level check of your system drive for errors using the Check Disk utility. If it detects errors, it volition automatically repair them.
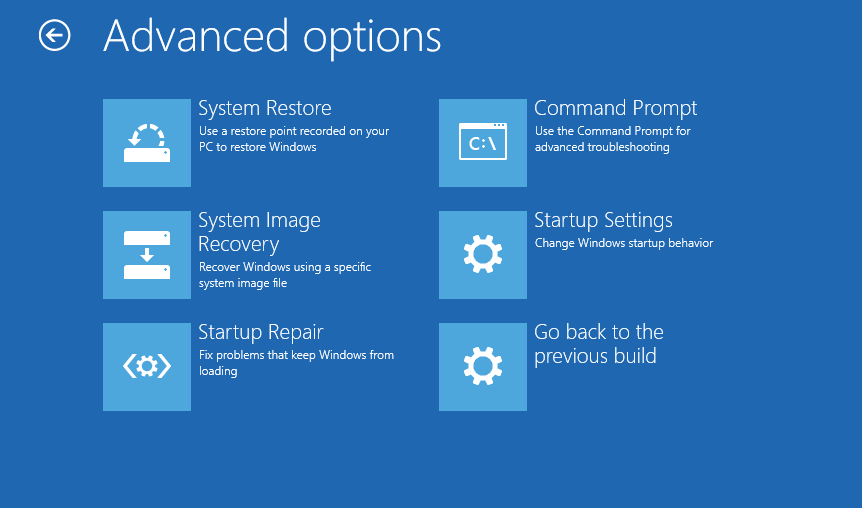
While Windows can't kick, you tin still force Windows to kick to a Command Prompt window using the Advanced options menu screen.
To do this:
- Restart your PC and printing the F8 key on your keyboard before the Windows logo and spinning icon appear. This will cause the Windows boot troubleshooting bill of fare to appear. Select See advanced repair options to begin.
- From the Choose an option screen, select Troubleshoot > Avant-garde options > Command Prompt.
- In the Command Prompt window, type the post-obit command and press Enter:
chkdsk c: /r - If the chkdsk command fails, you can also try using the Fixboot control. In the same Command Prompt window, enter the post-obit command and press Enter:
fixboot c: - Once y'all are finished, close the Control Prompt window and restart your PC.
two. Perform a Organization Scan in Safe Fashion
If system repair tools find corrupted files, Windows replaces those files with the local prototype. However, if this image itself has get corrupted, Windows tin can't repair itself and causes the previous commands to neglect. To repair this, we can use the DISM (Deployment Paradigm Servicing and Management) tool.
To utilize this tool, nosotros start must enable Safe Mode. This loads a basic version of Windows without any 3rd-party programs to help yous fix your kickoff-up errors.
- The commencement footstep, similar before, is to restart your PC and press the F8 key while booting to open up the Windows kicking troubleshooting carte.
- Select See advanced repair options > Troubleshoot > Advanced options > Startup Settings > Restart.
- Now, you lot will see a listing of various restart options. Choose Enable Safe Mode with Networking by selecting F5 on your keyboard.
- One time Windows boots up in Safety Manner, right-click the Commencement carte and select Windows PowerShell (Admin).
- In the PowerShell window, type the following control and printing Enter:
DISM /Online /Cleanup-Image /RestoreHealth - This will take some time to finish. When the DISM tool finishes running, reboot your PC and follow the higher up steps to open the PowerShell window in Safe Mode again.
- This time, type the following command and press Enter:
sfc /scannow - This volition check the integrity of Windows system files and allow us to verify if Windows is fully repaired.
three. Restore the Windows Registry
Sometimes, malware infections or disk issues can also end up corrupting the registry files.
To fix registry issues, you can restore it with the following steps:
- Open the Windows boot troubleshooting menu.
- Select Run into advanced repair options > Troubleshoot > Advanced options > Command Prompt.
- Blazon the post-obit command and press Enter:
C:\Windows\System32\config\regback* C:\Windows\System32\config\ - If you are asked to overwrite files, type All and press Enter.
- Once you are finished, restart your PC.
If yous believe that your Windows is functional, you can endeavor to disable the automatic startup repair organisation. This should allow you to boot into Windows without the repair loop taking identify. However, this will merely piece of work if your Windows system is working properly. You can use information technology to decide if your Windows is really at mistake.
To disable Windows ten automatic repair tool, follow these steps:
- Open the Windows boot troubleshooting carte.
- Select Come across advanced repair options > Troubleshoot > Advanced options > Command Prompt.
- Blazon the following command and press Enter: bcdedit
- Check the values for identifier and recoveryenabled. The identifier value should exist {default} and recoveryenabled should be yes.
- Now, type this control and press Enter:
bcdedit /set {default} recoveryenabled no - This will disable the automatic boot repair. If the command doesn't work, effort the following command:
bcdedit /ready {electric current} recoveryenabled no - Once yous are finished, restart your PC.
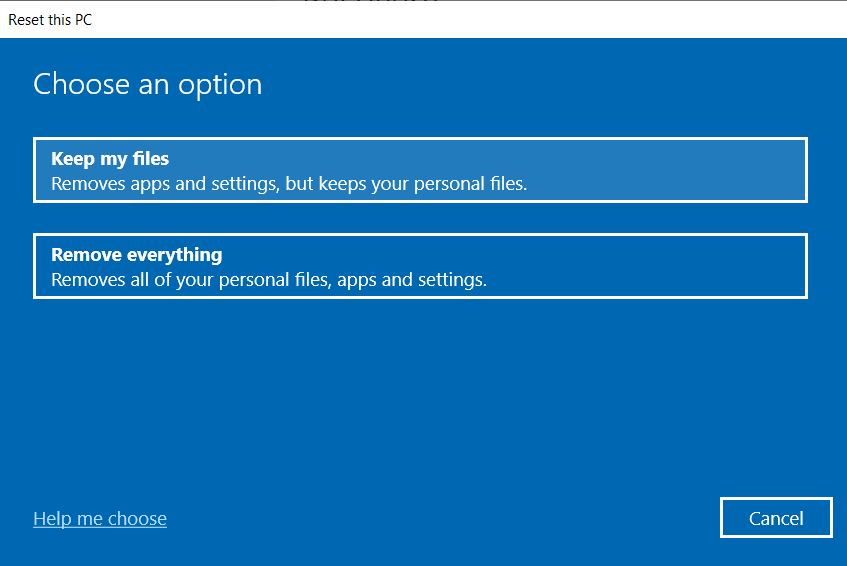
5. Reset Your Windows 10 Device
The final resort for a estimator stuck in an automatic repair boot loop is resetting Windows ten. You don't have to worry virtually losing your files and data as you have an option to go along with either a make clean reset (deleting everything) or preserve your files.
To reset a Windows 10 PC, open up the Windows kicking troubleshooting menu and select Troubleshoot > Reset this PC.
Dealing With the Automated Repair Loop
It can be frustrating to deal with a never-ending loop due to a tool meant to resolve your problems. It can exist difficult to diagnose and understand, but our solutions will exist sure to aid y'all out and return your PC to normal.
Well-nigh The Author


Source: https://www.makeuseof.com/fix-stuck-in-automatic-repair-loop-windows-10/
Posted by: hudsonthied1991.blogspot.com
0 Response to "How Do I Get My Computer Out Of Automatic Repair?"
Post a Comment